How to Trim and Shape the Perfect Beard Neckline in 11 Simple Steps
Maintaining a beard that looks fantastic takes some effort, but it should be a labor of love. You put in the time to make your beard look its absolute best, you use the right tools and grooming products, and you keep it healthy in a variety of ways. Because if your beard looks nice, then you look nice!
But don’t ruin it, and your efforts, with a poorly-groomed beard neckline.
An unkempt, poorly-maintained, and non-defined neckline has all the appeal of a shoddy pair of shoes paired with a classy business suit. You’ll stand out among the crowd for all the wrong reasons.
We’re here to help with this guide on how to trim and shape your beard’s neckline. We’ll cover all the bases, including which trimming tools to use, how to determine your neckline, and how to fix it when it needs a tune-up, so that you can continue looking your best.
How to Trim & Shape The Perfect Beard Neckline in 11 Simple Steps (A simple, illustrated guide)
Like many men, you may wonder why you need a beard neckline. It’s a valid question, and, the truth is, not every man wants a well-defined neckline.
If you’re one of those men, you’d rather let your beard grow naturally, and, hey, it may look great on you. There’s certainly nothing wrong with that, but many other men find all that extra neck hair to be uncomfortable while feeling that it looks untamed.
Another thing you might want to keep in mind is that not every man’s neck hair grows in a perfect rounded line. While you might be blessed with the perfect beard and a naturally occuring neckline, several men struggle with the shape of their neck hair, even if their facial hair grows fine.
There’s nothing wrong with that, either but knowing where you stand is key., andHowever, if you’re in the latter group, you may also sport a particular beard style that requires a well-defined neckline that requires proper technique and care to sculpt. If so, read on, friends.
1. First, Define Your Neckline
This step is a must before you get to work with your beard trimmer or razor. To trim your neckline properly, you need to define your neckline – no questions asked. Defining your neckline helps you to tidy up your beard to help it look its best. It will also make you look cleaner and more sophisticated with just a few simple steps.
Also, keep in mind that the neckline often varies, depending on the beard style. In general, however, there are a few tried-and-true methods for defining your beard neckline.
And remember: a poorly-defined neckline can become a bad-looking neckline after you’ve trimmed it. Just making it even is not going to do the trick, and you need to know how to do it right depending on different beard shapes and styles.
A well-groomed beard, no matter if it is a stubble beard or a bushy beard, can be ruined with a bad beard neckline. The term “facial hair” isn’t exactly accurate in this situation, as you have to take care of not just the hair on your face, but also below it.
Whatever you do, don’t ruin a great beard with a bad neckline. Know how to line up your beard and neckline and then go from there.
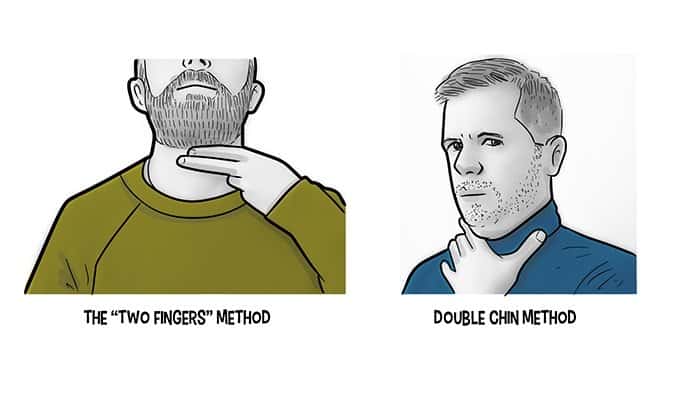
The “Two Fingers” Method – The Two Fingers Method is a great way to define your neckline, but keep in mind that everyone’s fingers vary in width, as does their neck.
Nonetheless, the Two Finger rule is an easy and generally effective way to find your proper neckline and determine where to shave your beard hair.
It’s pretty simple: stack your middle and index fingers just above your Adam’s apple. Just above that should be the line where your neck beard ends. But, again, everyone’s fingers vary in width, so one finger for you may equal two fingers for someone else. However, this can give you a pretty decent idea of where the outline should be so that your beard doesn’t look unnaturally trimmed.
Double Chin Method – Don’t panic! We’re not advising you to grow a double chin, so that you can find your neckline in a pinch.
Instead, you create a temporary double chin by tilting your chin toward your neck. In doing so you’ll create a natural fold where the double chin line meets the neck, and which runs the entire length of your jaw.
When it’s time to shave, you simply shave off everything below the neckline you’ve created with the double chin method. And, by all means, lift your chin to rid yourself of that second chin as soon as you’re done.
Things to Know Before Shaving
You also need to keep certain things in mind in your grooming game when you’re shaving or trimming your beard, so that you don’t suffer from problems like ingrown hair or razor bumps.
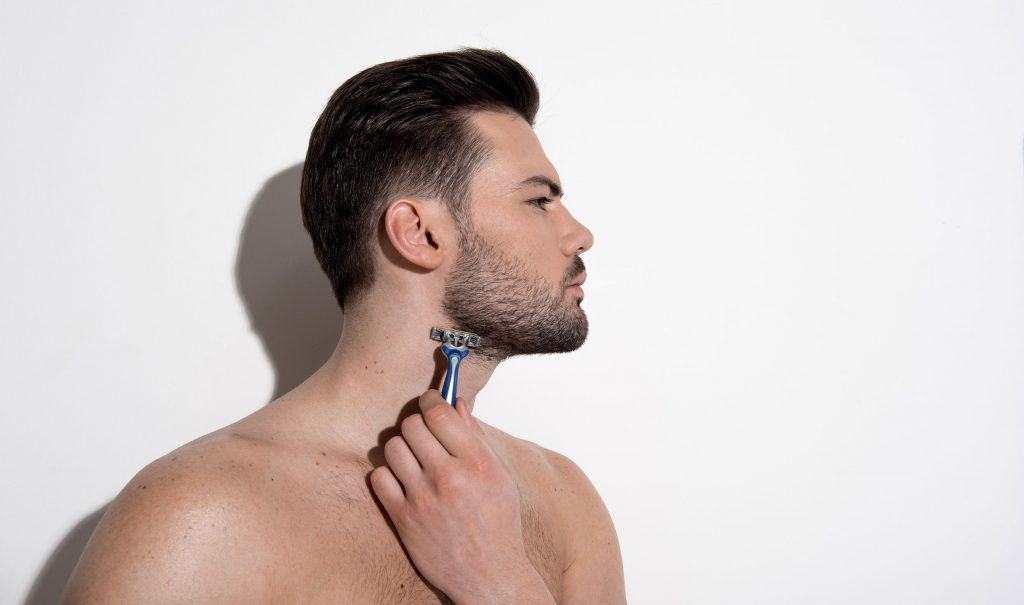
Before you shave, wet your hair and skin with warm water. This will soften the hair and give you the closest shave, as well.
If your hair is too long, try not to shave it directly. Give it a slight trim with an electric trimmer before you use a razor in a gentle curve on the neck.
Make sure you also use a sharp blade at all times when you’re shaving your facial or body hair. If you use a blunt razor, it will cut your hair at an odd angle. This can cause ingrown hair and razor bumps on your skin, which can ruin your look. Besides, all that hair tugging that coming with using a blunt blade isn’t the best experience.
Don’t shave against the grain. While it can be counterintuitive, you can use a few more strokes before the hair is gone, but it will ensure that you don’t have to suffer from painful razor bumps when you’re done.
After you’re done shaving, remember to moisturize your skin. This will hydrate your skin and heal any small tears that might have been left on it due to shaving.
2. Choose Your Tools
A carpenter never uses a screwdriver when he should use a hammer. The same principle applies for trimming your beard, i.e. you need the right tools to get the job done the right way.
Let’s inventory your grooming toolbox:
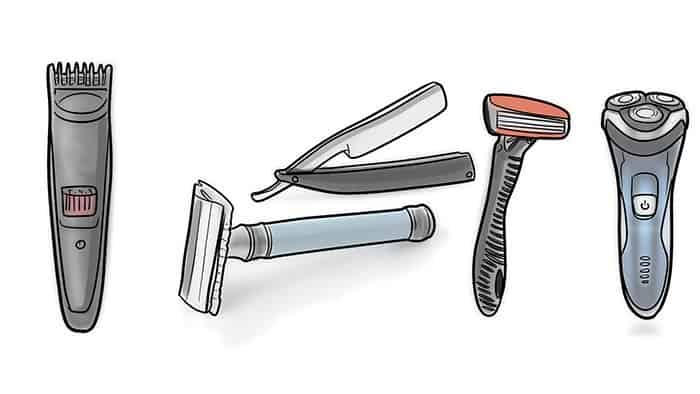
Beard Trimmer – Your go-to tool for trimming and shaping your beard’s neckline is a beard trimmer. A quality beard trimmer, such as the Braun Beard Trimmer BT5265 helps you take your beard grooming to the highest level.
There’s a wide variety of beard trimmers available, so choose wisely.
Among the things you should keep in mind when buying a trimmer is its versatility, whether it’s suitable for cord or cordless use (or both), the attachments that come with it, your beard’s length, whether you can use it for wet and dry use, and the quality of its blades.
When it comes to blade quality, those made of stainless steel, chromium, and titanium typically last longer and provide a cleaner, more comfortable shave than blades from other materials.
One of the many advantages of a beard trimmer is that it can cut hair of varying lengths.
Razor – While a trimmer is the easiest, most convenient tool for trimming and shaping your neckline, some men prefer using a razor for their trimming needs. As with buying a trimmer, you’ll have plenty of options regarding razors:
- Safety razors – Many men use double-edged safety razors. For starters, they’re easy to use, which makes them ideal for shaving newbies, and they’re also safe to use, because the blade is locked at an angle to help prevent nicks and cuts. But do keep in mind that the blade’s “locked in” angle can make it harder to shave around angular parts of your face.
- Cartridge razors – Purchasing a cartridge razor means buying the razor and its cartridges separately. The best cartridge razors help keep nicks and cuts to a minimum and are easy to use and control as you maneuver them about your face and neck. The main disadvantage with cartridge razors is that the blade cartridges can cost a small fortune and they have to be replaced pretty often.
- Straight razors – If you want to be a badass about your shaving, then a straight razor is for you. A straight razor is a vintage tool with plenty of current relevance. It’s hard to beat a straight razor’s close shave, but buyer beware: learning how to use one correctly takes some finesse and experience. If you insist on taking a ham-handed approach to shaving with a straight razor, make sure you have an ample supply of tissues with which to dab away the blood, and a high pain tolerance because those nicks pack a sting.
- Electric razors – Most men use electric razors to shave their whiskers off – by “off” we mean down to the skin – or to lessen their overall length. You can use an electric razor to keep the skin not covered by your beard completely free of whiskers. However, you also can do some trimming work with an electric razor, if you so choose.
Beard Shaper – Another handy beard neckline tool is a beard shaper, which is a template, i.e. beard neckline guide, usually made of clear plastic that helps you to achieve a variety of neckline styles: from a gentle curved cut to the curved step cut.
A shaper also enables you to properly line up your cheek line, as well as the line between the sideburns and your ears.
A couple of other good tools to have on hand when shaving your neckline are a beard comb or beard brush. A comb or brush will fine-tune your beard’s appearance (above the neck) to help you better define how you want to approach trimming your neckline.
Oh, don’t forget about a mirror – whether it’s hand-held or one secured to your wall. While there’s no law stating that you have to trim your neckline while watching what you’re doing, it’s strongly encouraged.
3. Shaping Your Neckline With a Beard Trimmer
A beard trimmer isn’t the only tool you can use to shape your neckline, but we think it’s the best tool.
Trimmers, at least the highest quality ones, are easy to hold, and their blades do most of the work for you. You don’t need to apply a ton of pressure – in fact, applying too much pressure isn’t advisable.
Getting started – A couple of key points to keep in mind before you start the trimming process:
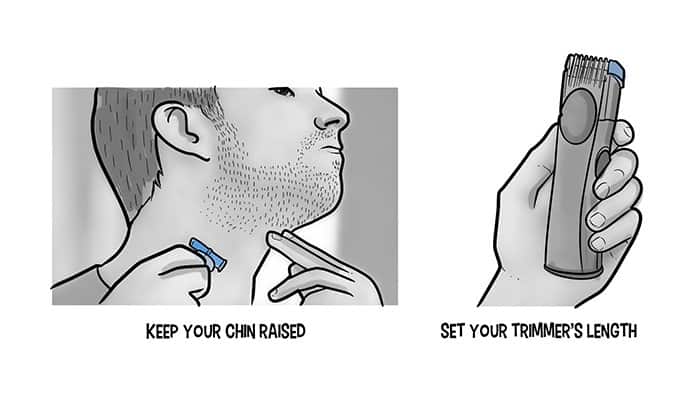
1) don’t trim too high. You don’t want your neckline encroaching on your chin or your face, because it makes your face appear too big for your beard
2) keep your chin raised and use the fingers on your non-shaving hand to stretch the skin tight under your chin as you trim.
Your skin will bunch up if you don’t keep your chin raised and pull the skin tight, which can result in you missing a spot or cutting yourself, if you’re using a tool other than a beard trimmer.
Set your trimmer’s length – If you’re like most men, you want to keep the length of your neckline, and your neck in general, shorter than the length of your beard. With that in mind, set your trimmer’s length settings to at least two levels shorter than your beard.
4. Following a General Beard Neckline Guide
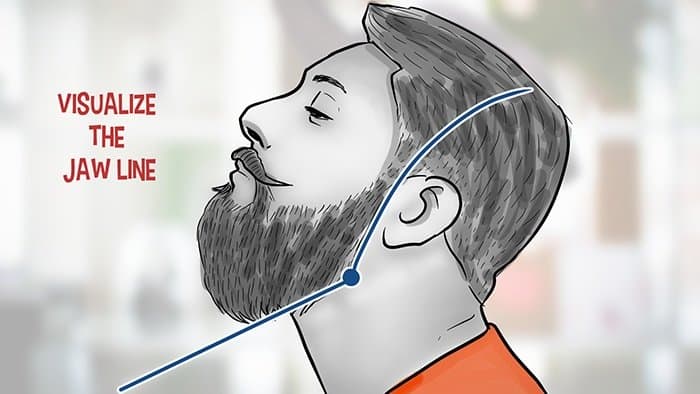
Another tip for trimming your neckline comes after you’ve defined it, and this requires a bit of visualization on your part. Imagine a slightly curved line that runs from right behind your ear lobes and travels under your jawline.
Again, the bottom of the imaginary line is very close to the top of your Adam’s apple, while the overall line has a “U” shape.
Once you’ve established the imaginary neckline – which, in a roundabout way, takes us back to defining your neckline – you should trim/shave everything below that line while trimming what’s above it at a length that’s appropriate for various beard neckline styles.
5. Shave With the Grain
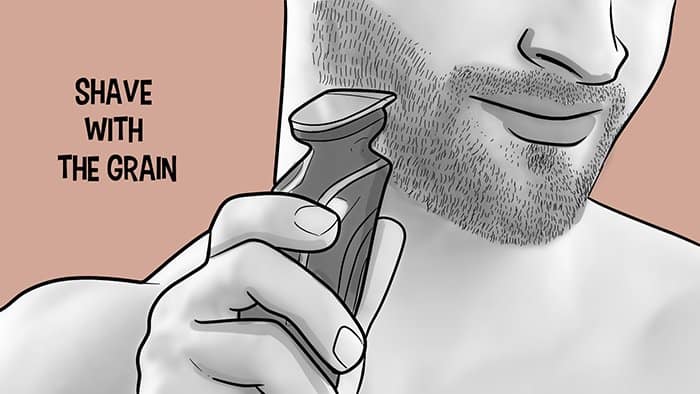
The best way to prevent irritated skin when trimming your neckline is to shave with the grain. Shaving against the grain may lead to ingrown hairs, which will definitely aggravate the skin. It can also cause razor bumps, inflammed and itchy skin. The smoothest path is always with the grain, not against it.
6. How to Get a Neckline Fade

A fade enables you to create a subtle, natural finish to your beard, rather than a harsher, crisp neckline, and creates a gradual change in the hairline from the neckline to the beard, and vice-versa.
In other words, the hair should slowly increase in length from the bottom of your neckline until it becomes fullest on your cheek.
It only makes sense: the maximum length of your facial hair is on your cheeks (your beard), while the shorter length resides on your neckline.
Here’s how to get a fade:
Set your trimmer’s length two settings lower than your beard to create a short beard neckline.
Use the shorter setting for the bottom half of your neckline (the area just above your Adam’s Apple that you’ve defined as your neckline).
Use the original setting on the upper half of your neckline, i.e., the area closest to your chin. The different length of hair between the bottom and upper halves of your neckline creates the “fade.”
Maintaining a proper fade requires a bit of extra work on your part but, when done properly, creates a distinctive, tapered finish that enhances your beard’s overall appearance and makes you look 10 times better.
As an added touch, don’t forget to shave off the stubble and stray hair below your neckline – all the way to your chest, if needed. Doing so creates a clean finish.
As a general rule, men with long beards have a bit less work to do when creating a fade, because the neckline is less noticeable, and a neckline that’s too short may stand out like a sore thumb. Don’t go overboard when trimming a long beard neckline.
7. Shaving With a Beard Shaping Tool
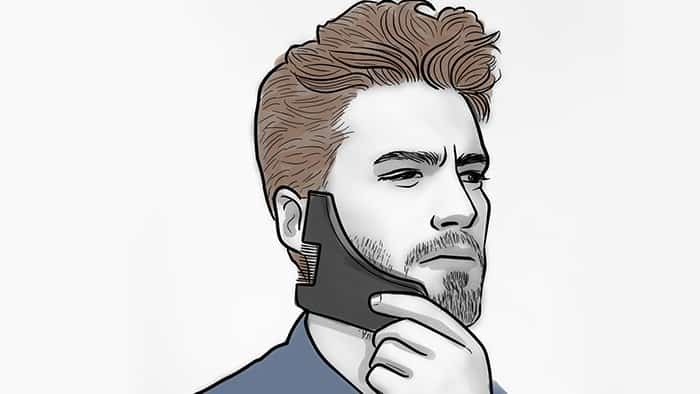
We briefly discussed beard shapers in our section on the tools you need for trimming your neckline the right way. A beard shaping tool helps you to ensure that your shaving lines are symmetrical and even, while it also helps you to define your neckline.
You’ll need to choose one of the beard shaper’s sides that work best with the contours of your neck, usually a curved side, and hold it in place along your neckline. Shave everything above or below the tool and right up to it.
8. When to Trim Your Neckline
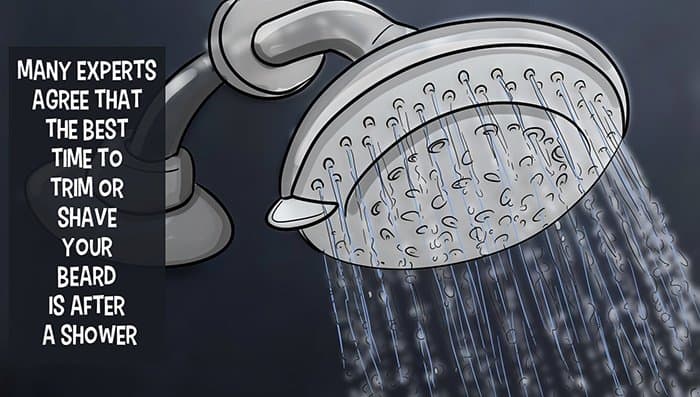
Many experts agree that the best time to trim or shave your beard is after a shower. The warm water opens up the pores of your face and neck skin, which makes shaving easier.
You can even press a warm towel on your face for a couple of minutes to create the same pore-opening effect. Of course, you need to make sure that your trimmer is suitable for wet and dry use.
Here’s another tip: use shaving cream for neckline trimming if you use a single-blade razor. You don’t need a lot of shaving cream – about a dime-sized amount – and you can mix it with a bit of water to give it a creamier texture.
9. Choosing the Right Neckline Style For You
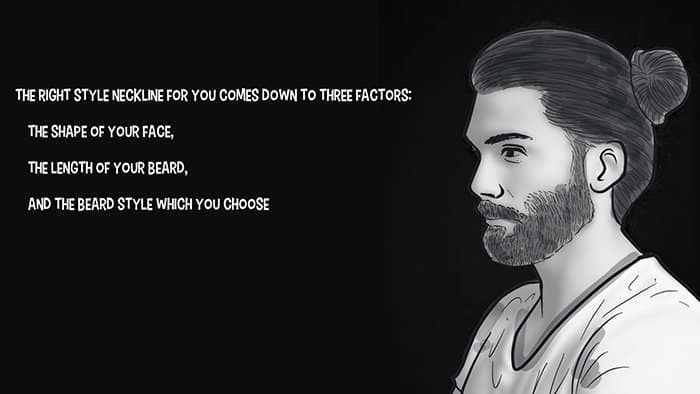
The right style neckline for you comes down to three factors: the shape of your face, the length of your beard, and the beard style which you choose.
Making your beard look good doesn’t just stop at the face, you need to make sure that your neckline is the right shape and size, as well. Using the Two Finger Rule and the Double Chin Rule, you can easily get a good estimate of where you should shave to get yourself a good-looking beard.
In this article, along with the best neckline options and tips, we’ve reviewed some of the products you can use to get a clean shape on your neckline with ease. If you’re unsure, check out our facial hair style guide to matching your beard with your face shape.
If you’re interested in similar topics, please feel free to check out our other articles, as well!
10. What to do if You Make a Mistake While Trimming Your Neckline
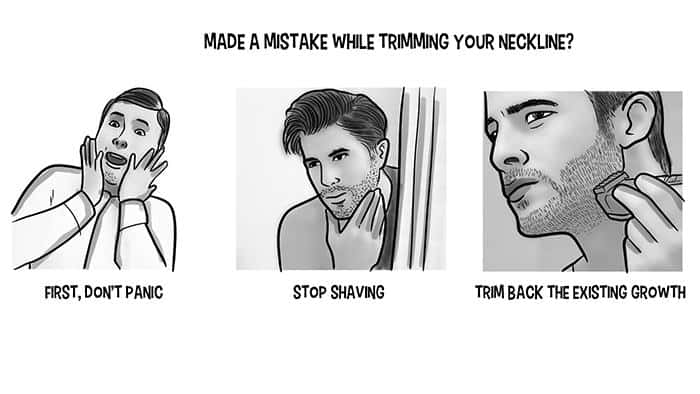
Mistakes happen. We don’t want them to happen, of course, but they can when doing any task, including trimming your beard neckline. What do you do if you mess up when shaping your neckline?
First, don’t panic – Making a mistake on your beard’s neckline isn’t the end of the world, and, unless you’re using a straight razor, it isn’t fatal (just kidding…sort of. Yeah, just don’t make a mistake with a straight razor people).
Stop shaving – An easy escape route after making a mistake is to stop shaving for a week or two. Your beard will grow beyond the neckline you wish to modify, which allows you to start over.
Or, you can stop shaving for a couple of days and define your new neckline with the newer growth.
Trim back the existing growth – You can also trim back some of the existing growth to allow new growth to blend in with it. If the newly-defined neckline suits you, then your job is finished until the next time you (flawlessly) trim.
11. Don’t Forget About Aftercare
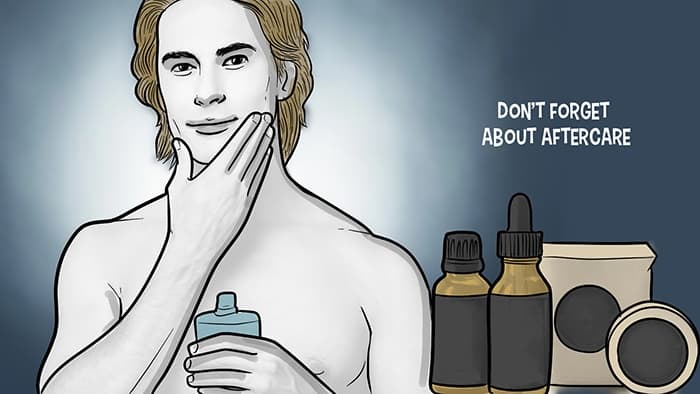
What you do after trimming your neckline or beard is essential to your beard’s overall health. Here are some things you can do to enhance your beard’s aftercare:
Close your pores – It’s easier to trim and shave when the pores of your skin are open, such as right after you shower, but you should close them once you’ve finished trimming by applying cold water or an alcohol-free aftershave to your skin.
Doing so helps keep your skin clean and healthy.
Use beard grooming products – Trimming and fading are important for maintaining a well-groomed beard and neckline, but regularly cleaning your beard with a quality beard wash or beard shampoo is essential.
Also, don’t forget about beard oil and beard balm, which help nourish and hydrate your beard – and the skin beneath it – while making your whiskers easier to manage.
Conclusion
A well-defined neckline is often the difference between a beard that looks properly groomed and one that doesn’t. Following a few guidelines and using the right trimming tools help you to achieve an overall look that enhances your beard’s appeal.
As always, we welcome your feedback. How do you maintain your beard’s neckline? What kind of tools do you use? We hope to hear from you.
About The Author
